Friday, August 22, 2014

Chair Progress


So here is a recap of what I've started with


Not a super pretty sight, but there is potential!!

Tyler helped me staple the chairs together. I tried on my own, but it definitely wasn't as easy or pretty without him.
He stapled while i tugged on the fabric. We started by getting the middle of each side.

We did it in a pattern of north, south, east, west. Then tackled the corners. Those were a bit more tricky, but we did it. Not the most smooth or fancy looking- but hey! This was my first time! :)


Not too bad, eh?

Next I got to work on the back rest if the chairs. I saw a bit of vinyl fabric peaking through the gold. 
Here is a little good news, bad news. Which do you want first? 
Well, you actually don't have a choice, haha :)
Good news: So I cut the gold fabric away to find this gorgeous retro fabric underneath! Score!mi wasn't worried about the yellowing because the sun can bleach that out in a hot minute. .....


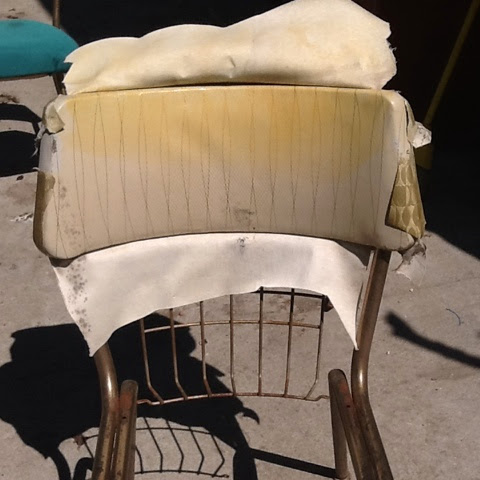
Bad news: I left these chairs outside for too long, so the whole inside is molded. I can't salvage the pretty fabric :(

I apologize for your lunch being ruined... Gross, huh!

So that's as far as I've gotten on these chairs so far. I'm not quite sure how to replace the fabric on the top with the green fabric I have. Any tips? But I'm sure I'll figure something out :)

Moral of the story: don't procrastinate and leave your pretty chairs out in the elements for 6 or so months.... :)
Jamie 


Thursday, August 21, 2014

Take a step up

Here is an update on our stairs! Tyler has been hard at work these past few days on getting our stairs  completed. I am continuously amazed at his ingenuity and diligence! He is determined to complete these stairs soon! And without having to make a million trips to Home Depot, haha

For example- all the wood to make the railing came from our porch and reclaimed 2x4's since Home Depot had closed. But reclaimed wood is all the rage right now- so I guess we are just on trend ;)

Here is what it looks like at the top of the stairs. Creeeepppppy, huh! You can see the top 2 steps. 
There is what we call- dead space, between our current ceiling and the floor of the attic. 
See, our current ceiling is about 8 1/2 feet tall. But the original ceilings were about 12 feet. Someone thought it was a great idea to make the ceiling 3 feet shorter..... Hmmmm....
Looking at the type of materials used to shorten the ceiling, it looks like this was done in the 60's or so. And drop down ceilings were the trend around that time. 
Here is a look at the wood used, if you can actually see it from in this picture! They are actual 2 by6's. Here's is a fun fact- if you go to the hardware store and buy a 2 by 6, it actually measures about 1 3/4 by 5 7/8. Not 2 inches by 6 inches. Who knows why! But back in the day, the wood would ACTUALLY measure 2 inches by 6 inches. That's how we were able to tell when the drop down ceiling was probably added.

Here is a better look at our current ceiling height (up to the white), the original ceiling height (the cream area), and the ceiling joists. We could raise the ceiling up to the original height.... But that would be so much work and dust and lead paint. We decided not to mess with it for the time being. :)
I am, however, trying to convince Tyler that some secret passageways would be a great idea! He's not on board.....yet.


But we did have a structural engineer come and look at our roof structure. Looks like we should be able to cut those ceiling joists you see in the picture above. And restructure the support in our roof to give walking room. Yay! We're excited :)

It will be great to have the extra room. We are planning 2 bedrooms, a bathroom, and a family room to be added up there. Then Todd won't have to sleep in the front room anymore! But it is nice to see his cute sleeping face all the time :) .... Speaking of.....


Here he is now as I type :)
Wish us luck!
Jamie


Thursday, August 14, 2014

No pretty pictures

So I have not written a post for a while because  I don't have any pictures to accompany them!
Then I realized that pictures don't constitute a blog post..... Words do.
Actually, I JUST realized that as I was typing it. Hmmmm....'words do.' That is liberating!

Back to the first train of thought I was on. (Do you ever think 2 things at once? I totally do and my poor hubby has to try to keep up :)
....first train of thought....what was it? Oh yeah!!!! 
We had a girls night. :) it was so fun! Todd was included, but we still called it a girls night. I guess girls +1cutebabyboy night, haha.
Tyler decided to spend the evening with his brother playing Starcraft, yay for them! It is nice to do something like that every once in a while. And nice for me to stay home :) So I planned some girl (+1cutebabyboy) time. 
I ran to the neighbors and borrowed Frozen since it is a favorite of every little girl, I'm sure. Maybelline was singing the 'let it go' song after only seeing the movie once! And the movie was still fun to watch since we have only seen it a handful of times. No repeating-every-line-since-you-have-seen-it-a-ridiculous-amount-of-times going on here! 
They (and I) were SOOOO excited! I got the laptop ready in their room and started the movie. There were a few technical difficulties, and slight frustration but I calmed down and got it working :) when it started, squeals commenced....from all of us girls, haha. then we paused the beginning of the movie and said a prayer to thank Heavenly Father for the opportunity to have time together :)
Then.....I got a wild hair in me.....and pulled out....
CHOCOLATE!! at 10pm too!! Haha
Those girls loved it. I gushed on baby Todd until he fell asleep about 9:30 ish and we finished the movie together, 
It was so nice. I think the what made it nice was mostly MY attitude. I had thought about it and gotten excited. That excitement passed onto my girls, and we were able to enjoy it as the precious time it was. 
Just a movie and chocolate. But really, it was time with my 3 favorite cuties in a loving setting.
I'm so grateful for the time with them *looks heavenward*
Jamie

Tuesday, August 5, 2014

How to help a fever

Now, I'm not a doctor, and to avoid being sued- please consult a doctor before trying any of thee home remedies. Who knows! You might be allergic to lemons! 

My hubby has had a bad fever the past few days. Like 102. Poor thing. And I finally broke my fever last night. Let's just say both of us  being sick with three kids is a little challenging! But the kids aren't sick- so it could be worse :) *knock on wood*

Tyler and I were discussing what fevers do. And it is your body trying to kill the bacteria/virus by raising the temperature. So we decided to not give him Tylenol as long as his temp is under 102 so that his body can actually raise the temperature to kill those naughty germs :) 

So without medicine we have been doing a few other things to help the aches and pains of a fever.
First up: 
A Hot Lemon Bath. Oooooo. Doesn't that sound nice!! Fever or not- sign me up :)
The heat and lemon is supposed to help you sweat out the toxins that your body is trying to get rid of.
And plus it feels so nice when you feel continually cold during a fever!

And for some reason I feel nauseous during a fever. Hmmm. Don't ask my why. Anyone else have that?
To help with that I use the B.R.A.T diet :)

Bananas
Rice
Applesauce
Toast!

They are easy to eat on an upset tummy and help you get the nutrients you need while you're sick.

We are also doing lots of fluids, prayers, and rest.
Oh yeah! Sleep!! How could I forget??
I feel like sleep is pretty much the #1 way to get better.
 (Unless you're like me and have a newborn/husband/2littlegirls to take care of and you are woken up every hour of the night, ha!)

Any other tips out there that help you feel better when you're sick? 

Jamie